
One of the easiest and most effective techniques is the 3 point lighting setup. Good lighting can make a huge difference in how professional your interview videos look. The best part here is you don’t need to spend a lot of money.
With a few affordable lights or even some clever DIY options, you can create a great look without breaking the bank. Whether you are shooting with a camera or a smartphone, good lighting can instantly improve the quality of your interviews.
What is a 3 Point Lighting Setup?
A 3 point lighting setup is a simple and popular way to for videos and photos. It helps make the subject look clear, natural and professional. This setup is used in many interviews, films and photo shoots because it creates a balanced and attractive look. Even beginners can use it easily and it works well with different types of cameras and spaces.
It includes the following lights:
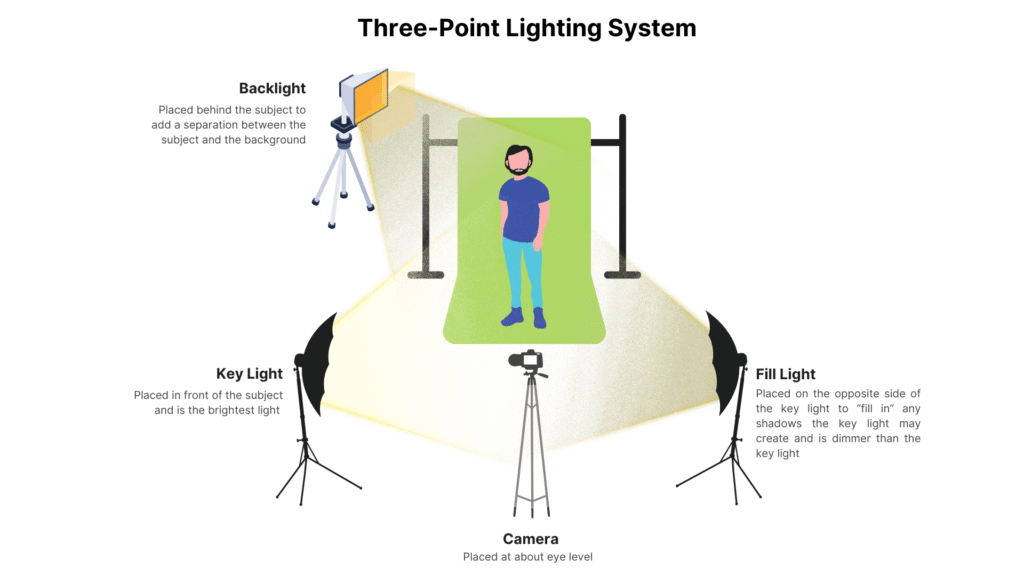
1) Key Light
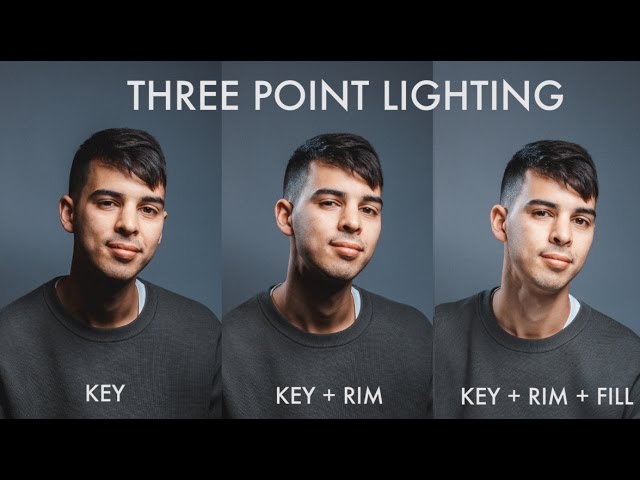
The key light is the main light used in a 3-point lighting setup. It is placed in front of the person, slightly to one side around 30 to 45 degrees and a little above their eye level. This light is important because it shapes the face and adds depth. When positioned correctly, it helps the person look natural and gives the image a 3D feel.
2) Fill Light
The fill light is a softer light used to lighten the shadows created by the key light. It is placed on the opposite side of the key light. This helps to look more even and natural. The fill light is not as bright as the key light, so it does not remove all shadows. It just softens them a bit.
This helps avoid harsh contrasts and makes the person look more flattering on camera. Overall, the fill light helps balance the lighting and gives a nice, natural feel to the video or photo.
To experiment with the fill light, move it closer or farther from the person and change its angle to see how the shadows change. Make it brighter or softer to find what looks best. You can also use things like white boards to reflect light instead of a lamp. Turn the main light on and off to see how both lights work together. This helps you make the lighting look natural and nice.
3) Backlight or Rim Light
The backlight, as the name suggests, is placed behind the subject and shines toward their back. The backlight is a light placed behind the person. It helps to show the person clearly by creating a soft light around their head and shoulders.
This makes them stand out from the background. The backlight is not very bright and is softer than the main light. It makes the photo or video look nicer and more clear.
The Use and Importance of 3 Point Lighting in Interviews
3 point lighting helps your interviews look clear, professional and easy to watch. This setup brings focus to the person speaking and gives the video a clean and polished feel. Good lighting equipment can make even a simple setup look high quality. This creates a clean and balanced look that is easy to watch.
The important thing about 3-point lighting is that it makes your video look better. Even if you have a simple camera, good lighting can change everything. It adds depth, softens harsh shadows, and helps keep the attention on the person talking. These things are very important for making an interview look clear and professional.
How to Set Up a 3-Point Lighting System for Interviews
Good lighting can make a huge difference in how an interview looks on camera. AI for lighting a film can simplify the 3-point lighting system and it is one of the easiest and most effective ways. By using three different lights in a specific setup, you can create a balanced, professional looking video.
- The 3-point lighting setup is a simple but effective way to light interviews professionally.
- It uses three lights called the key light, fill light and back light to balance the lighting on the subject.
- The key light is the brightest and shines on the subject’s face from a slight angle to highlight features.
- The fill light is softer and placed on the opposite side to reduce shadows and create even lighting.
- The back light is behind the subject to create separation from the background and add depth to the image.
- Together, these lights help make the person look clear and natural on camera.
Lighting Setup for Interviews on a Budget
You don’t need expensive equipment to use the 3-point lighting system effectively. Even basic lights or household lamps can work if placed correctly as the key light, fill light and back light. This setup helps reduce shadows on the subject’s face and makes the interview look clear and professional. What matters most is the placement of your lights, not how much you spend. With a little creativity and care, you can greatly improve your video quality and make your interviews look polished without spending a lot of money.