
Smooth, steady footage is a big part of what makes videos look professional. To stabilize your camera without a gimbal, try using techniques. But if you do not have a gimbal, you might think it is impossible to get those clean shots. The good news? You don’t need expensive gear to stabilize your camera. With a little creativity and a few cheap tools some of which you might already have at home you can shoot smooth hand held videos that look just as good.
Whether you are a beginner filmmaker, a content creator on a budget or just someone who loves DIY solutions, this will show you how to stabilize your camera without a gimbal. From using your body as a natural stabilizer to building your own rigs with basic materials, these tips will help you improve your shots without breaking the bank.
Why Stability Matters in Filmmaking?
Before trying any DIY methods, it is important to understand why keeping your camera steady matters. Shaky videos can be distracting and hard to watch. Unless you are going for a specific shaky style like in a found footage horror movie unstable shots can make your work look unprofessional. Just as a steady camera is essential, using a proper 3-point lighting setup helps ensure your shots are clear and visually balanced, enhancing the overall quality and professionalism of your video.
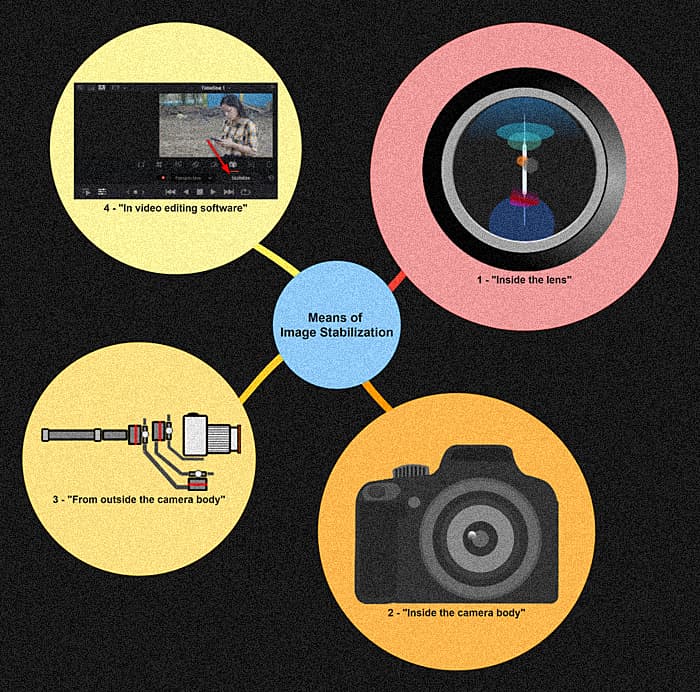
Stabilized footage makes your video look polished and professional. It helps viewers focus on the story, not the camera movement. Even subtle shakes can break immersion. Now let’s look at how you can stabilize your shots without investing in expensive gear.
1) Use Your Body as a Stabilizer
Your body can be one of the best tools to stabilize your camera. With the right posture and movements, you can reduce camera shake significantly.
Techniques:
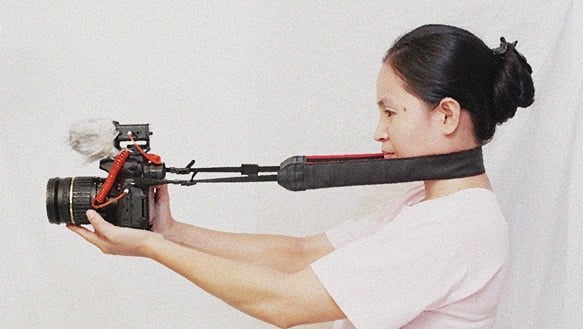
Always hold the camera with both hands and keep your elbows close to your body to create a strong base. Also, slightly bend your knees to help absorb movement when walking or panning. For short shots, try holding your breath to reduce any motion from breathing. Another helpful tip is to use the camera strap wrap it around your neck and pull the camera forward a bit so the tension gives you extra stability.
Example: A YouTuber filming a walk and talk segment without a gimbal can use the strap method combined with bent knees for smoother footage.
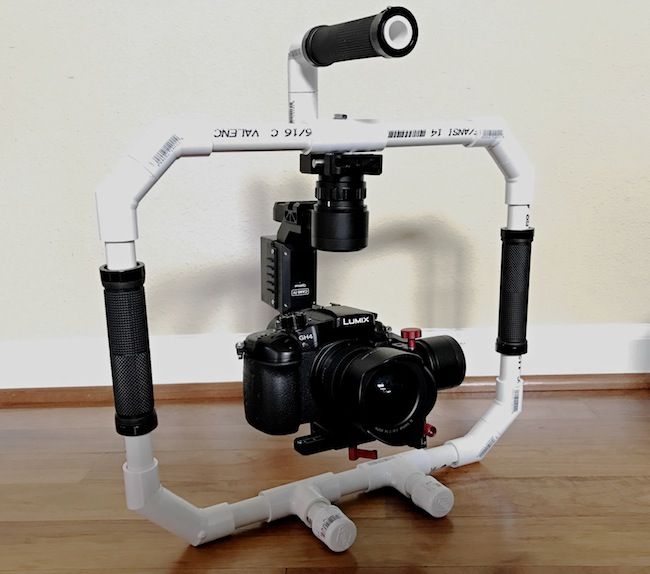
2) DIY Camera Stabilizer with PVC Pipes
PVC pipes are cheap, light and easy to work with. You can build a simple stabilizer handle to help keep your camera steady.
Easy Steps to Build Your Own PVC Camera Stabilizer
First, gather a few PVC pipes, elbows, and connectors from a hardware store. Then, cut the pipes to the size you need and connect them to form a handle and frame for your camera. Make sure it feels balanced and comfortable to hold. This setup helps reduce shaky footage by giving you better grip and control while filming. It’s a cheap and easy way to improve your shots without buying expensive gear.
Example: Filmmakers shooting skateboarding or low angle walking shots often use these DIY rigs to stay close to the ground while keeping footage stable.
3) Use a Tripod as a Handheld Stabilizer
If you already have a tripod, you can use it as a makeshift stabilizer. Collapse the legs and hold the tripod by the base. Let the tripod hang downward, using its weight to reduce shaky hand movement. Alternatively, open the legs slightly and use them as extra contact points against your body. The added weight and distribution help absorb vibrations.
Example: A travel vlogger walking through a busy market can use a folded tripod to stabilize the camera while still moving freely.
4) DIY String Tripod or String Stabilizer
You can create a quick and easy camera stabilizer using just a string. Start by attaching a string to the bottom of your camera using the tripod screw mount. Then, let the string drop to the ground and step on it with your foot to create tension. When you pull the camera upward against the string, it helps keep your shots steady. This is a cheap and portable solution, perfect for travel or quick shoots when you don’t have a tripod.
Example: Ideal for filming interviews or scenes where you’re standing still but want steadier shots.
5) Counterweights and DIY Glidecams
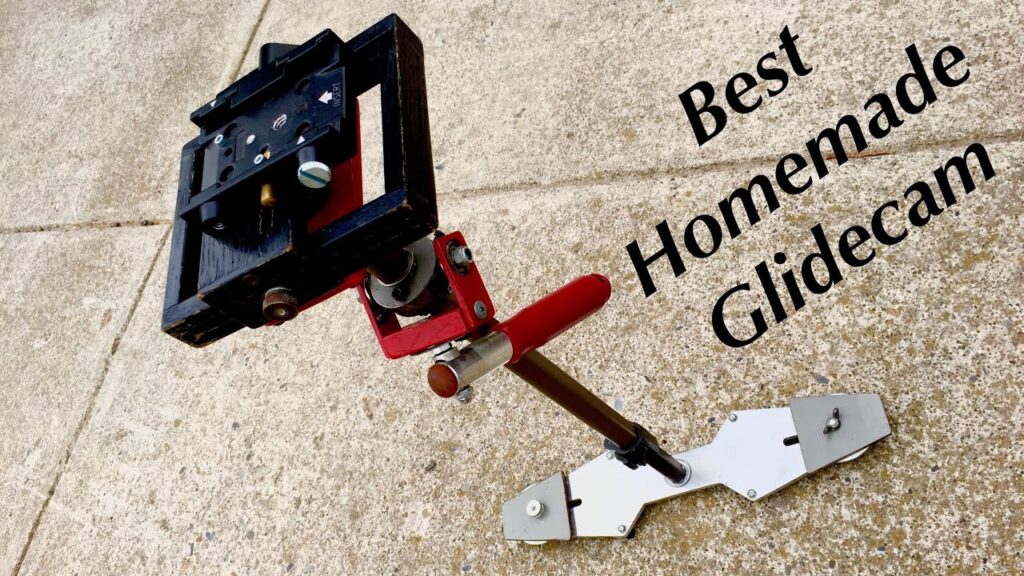
The idea behind stabilizers like Glidecams is balance. You can create your own using counterweights. You can build your own glidecam using basic materials like metal rods, screws and counterweights. The idea is to balance your camera on a central pole with a handle, while using counterweights like washers or small weights at the bottom to keep it steady.
This setup helps reduce shakiness by allowing the camera to “float” as you move. With some careful balancing, you can achieve smooth, cinematic shots without spending a lot on professional stabilizers. Balancing takes time, but the swinging motion helps eliminate shakes.
Example: A wedding videographer can use this setup for dramatic walking shots down the aisle without spending hundreds on a gimbal.
6) Use a Monopod for Movement Shots
For podcast who also film their episodes, using a monopod can improve video quality without heavy equipment. Here are some helpful tips:
Add a sandbag or a small weight to the base of your stabilizer for extra balance. You can also use it like a “poor man’s steadicam” by holding it lightly and letting the weight do the work to steady your movements.
Example: For panning shots at an event or concert, a monopod allows smoother left right movement with reduced shake.
7) Household Items as Stabilizers
You don’t always need to build something. Look around your house for tools that can act as stabilizers.You can use simple items around you to keep your camera steady. Hold a backpack against your chest and place the camera on top. A bean bag or rice bag can help balance the camera on rough surfaces.
Stack some books or boxes to get the right height for still shots. You can also use a shopping cart or rolling chair to move the camera smoothly like a dolly.
Example: A short film director shooting indoors can place the camera on a bean bag on a table for smooth and fixed shots.
8) Software Stabilization in Editing
Modern video editing software can fix a lot of shaky footage. You can also improve your footage using video editing software. In Adobe Premiere Pro, use the Warp Stabilizer effect to smooth out shaky clips.
DaVinci Resolve has a built-in stabilizer found in the Color tab. iMovie and Final Cut Pro offer a simple stabilization toggle for quick fixes. For the best results, combine these tools with your DIY methods.
Caution: Too much software stabilization can warp the image or crop the frame. Always try to get it as stable as possible during shooting.
9) Slow Motion Helps Mask Shakiness
When you shoot in slow motion, it reduces the visible impact of small shakes. This is not physical stabilization, but it is a useful trick. For smoother videos, try shooting at 60fps or higher, as this captures more detail and reduces motion blur.
Also, remember to stabilize your footage in post- production using editing software. This combination helps make your shots look more steady and professional.
Example: A scene of someone running can look much smoother when slowed down, even if shot handheld.
10) Practice Smooth Camera Movements
No matter what tool you use, your own technique plays the biggest role in stabilization. Here are some useful techniques for smoother filming.
Instead of walking straight toward your subject, try moving in a “Z” shape to make your motion softer. When walking, use a heel to toe step to reduce bouncing. Also, always pre plan and rehearse your camera movements before you start filming to get better results.
Example: A handheld chase scene in an action short film can look intense but controlled with the right walking style and camera hold.
How to Keep Your Videos Smooth?
Stabilizing your camera without a gimbal is completely possible and it does not have to cost a lot. By using your body wisely, building simple DIY rigs, or even relying on everyday household items, you can achieve smooth, professional looking shots on a budget. The key is to practice good camera handling and combine these tools with smart filming techniques.
Remember, great filmmaking is not just about fancy equipment it’s about creativity, patience and making the most of what you have. So next time you pick up your camera, try out some of these cheap and easy stabilizing methods. With a little effort, your handheld videos will look steadier, cleaner and more enjoyable to watch.