
Photo editing can be fun but tricky at first. Adobe Lightroom presets help you make your photos look great with just one click. With so many tools, sliders and color options, it can be hard to know where to begin. They make editing faster, easier and more consistent.
Whether you are a beginner trying to improve your Instagram feed or a professional photographer looking to save time, Lightroom presets are a helpful tool.
Adobe Lightroom Presets: Definition, Features and Benefits
Adobe Lightroom preset is a pre saved group of photo editing settings. Instead of adjusting each setting manually, you can apply a preset with just one click. It’s like using a filter but more powerful and customizable. AI tools can apply presets or custom corrections with just one click, saving time and boosting creativity.
For example, a preset might adjust the brightness, contrast, colors and tones of your photo all at once. Each preset creates a different look or mood, such as bright and airy, dark and moody, vintage, film like or warm and golden.
Presets can be used in all versions of Adobe Lightroom on your phone, tablet or computer. There are default presets built into Lightroom and you can also download thousands more online or make your own.
Features and Benefits of Using Adobe Lightroom Presets
Lightroom presets are not just handy tools they are powerful features that can completely change the way you edit photos. Whether you are a beginner learning the ropes or a professional looking to speed up your workflow, Adobe Lightroom presets offer a wide range of helpful features and practical benefits. Here are the main features of Lightroom presets:
1) Adjustable Strength
You can control how strong the preset appears. If the effect looks too heavy, you can tone it down easily.
2) Non-Destructive Editing
Applying a preset doesn’t change your original image. You can remove or change it anytime without damaging your photo.
3) Easy Organization
You can organize presets into folders or groups inside Lightroom, making it easy to find the style you need.
4) Works on Multiple Devices
If you use Lightroom with a cloud account, your presets can sync between your phone, tablet, and computer.
5) One Click Editing
Presets allow you to apply several edits at once with a single tap or click. No need to spend hours adjusting every photo manually.
6) Custom Look
Each preset creates a unique style or tone. You can find presets for portraits, landscapes, weddings, travel photos and more.
Using Lightroom presets offers several valuable benefits, especially for those who want to edit photos quickly and consistently. First of all, presets save time by allowing you to apply a full set of edits with just one click, which is perfect for editing large batches of photos. In addition, they help create a uniform look across your images, which is ideal for building a consistent style on social media, websites, or portfolios.
Moreover, presets are beginner-friendly, as they provide an easy starting point and help users understand how different editing settings affect an image. For professionals, they are a great way to speed up the editing process while maintaining high-quality results. Overall, Lightroom presets make the editing workflow more efficient, more creative. It is easier for everyone from beginners to experienced photographers by simplifying complex color grading processes.
Download and installation for desktops and mobiles
Before you can start using Lightroom presets to edit your photos, you need to know how to download and install them. Thankfully, the process is simple and only takes a few minutes. Whether you’re using Lightroom on your computer or mobile device, you can easily add new presets to your library.
Step 1: Download the Preset
You can find presets on photography websites, preset shops, and even for free on blogs or Instagram. Presets usually come in files.
Step 2: Unzip the Files
If you download a ZIP file, you’ll need to unzip it first. Inside, you’ll find the actual preset files.
Step 3: Open Lightroom
Launch Lightroom on your desktop or mobile device. Make sure you’re signed in to your Adobe account.
Step 4: Import the Preset
Go to the Develop module. Then, find the Presets panel on the left. Click the + icon and choose Import Presets and select the preset files . Then, click Import.
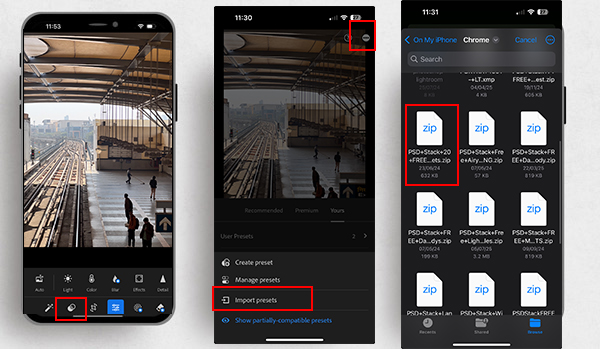
To import presets on mobile, open any photo and tap the Presets icon. Then, tap the three dots or select “Import Presets.” From there, choose the preset file you want to import, and it will be added to your collection. Now your presets will show up in the preset menu and be ready to use.
Popular Lightroom Presets to Try for Photography
With so many Lightroom presets available, it can be hard to know which ones are worth trying. Here are some of the most loved and widely used Lightroom presets:
1) Bright and Airy
These presets make photos look light, clean, fresh and great for weddings, portraits and lifestyle blogs.
2) Orange and Teal
A popular film-style look that brings out skin tones and adds a cinematic feel. Great for travel and urban photography.
3) Moody Tones
Dark and rich colors with lots of contrast. Ideal for portraits, fashion, and autumn photos.
4) Black and White
Timeless and classic, these presets not only remove color but also shift the focus onto light, shadows and textures.
5) Vintage Film Look
These presets make your photos look like old film shots. They often have faded colors, grain, and soft tones.
6) Golden Hour Glow
Adds warmth and softness to make photos look like they were taken during sunset or sunrise.
How to Edit with Lightroom Presets for Beginnners
Applying a preset is easy, but editing with it thoughtfully makes your photos even better. Here’s how to get the most out of a preset:
- Choose a Good Starting Photo: Make sure the photo is not too dark or overexposed. Good lighting helps presets look their best.
- Adjust the Strength: Use the “Amount” or “Intensity” slider to make the preset more or less noticeable.
- Apply the Preset: Open your photo in Lightroom and click or tap the preset you want to use.
- Fine-Tune the Edits: After applying the preset, you might still need to fix the exposure to adjust the brightness and correct the skin tones, sharpen or soften the image and remove any noise or grain.
- Use Masking: In newer Lightroom versions, you can edit just the sky or just the subject using masks. This helps if parts of your photo need special attention.
- Check Before and After: Always compare your edited photo to the original to make sure it looks natural and not overdone.
Tips for Importing and Managing Photos Using Lightroom presets
Once you start collecting Lightroom presets, it’s important to keep them organized and easy to find. Importing presets correctly and managing them well can save you time and make your editing process smoother. Here are some helpful tips when dealing with multiple presets:
- Only Keep What You Use: Don’t keep hundreds of presets you never touch. Keep your favorites and remove the rest.
- Test on Different Photos: Not every preset works on every photo. Test presets on different types of images to see how flexible they are.
- Watch Out for Compatibility: Some older presets don’t work on new versions of Lightroom. Make sure the preset is compatible with your app version.
- Sync Across Devices: If you’re using the Lightroom cloud version, your presets can sync to your phone and computer automatically.
- Organize Your Presets: Group them into folders like “Portrait,” “Travel,” “Black and White,” etc. This keeps your workspace clean.
How to Manually Create Custom Lightroom Presets
Creating your own preset is a great way to develop your personal editing style. Here’s how to do it:
Edit a Photo Manually: Start by editing a photo the way you like. Adjust exposure, contrast, colors, tones and more.
Save Your Settings: On mobile, tap the three dots and select Create Preset. On desktop, click the + next to the Presets panel and choose Create Preset.
Choose What to Include: You can select which settings to save in your preset. For example, you might skip cropping or selective edits.
Name and Organize: Give your preset a clear name like “Warm Skin Tones” or “Outdoor Soft Light.” Save it in a folder where it’s easy to find.
Test on Other Photos: Apply your preset to different photos and see how it performs. You might need to tweak or make more versions.
Share or Sell: If your presets work well and look good, you can share them with friends or even sell them online.
Making Photo Editing Easy with Lightroom Presets
Lightroom presets are more than just shortcuts they are a powerful way to improve your photo editing, develop your style and save time. Whether you are a hobbyist or a pro, presets help you get stunning results with less effort. Remember, the best edits are not always the flashiest.
A well used preset enhances your photo while keeping it natural and beautiful. Use presets as a starting point, then add your own creativity. Now that you know how to download, install, use and even create your own Lightroom presets, you are ready to take your photo editing to the next level.