
Film Production is more than just a camera and a talented cast. It is a well organized system that keeps everything running smoothly from the first idea to the final edit. Whether you are creating a 2 minute short or a full length feature, the filmmaking process involves many moving parts.
It includes writing, scheduling, budgeting, shooting, editing and more. Keeping track of all this manually is not only overwhelming, but also prone to mistakes. That’s where film production software comes in.
What Is Film Production Software and Why It Matters From Script To Screen
When people think of filmmaking, they often picture bright lights, actors, and cameras. But a lot of work happens long before the first frame is recorded and even more after. Film production software are tools built to help in every stage of making a film from writing the story to delivering the final product.
They let teams work together, organize ideas, track tasks, edit footage and more. With strong software, making a film becomes more orderly, creative and efficient.
How Pre-production and Post-production Help in the Film Journey?
Production software helps make movies by keeping everything organized. It’s useful from the start to the end planning, filming and editing. It helps with scripts, schedules, budgets and working with the team. This makes the whole process faster, easier and more creative for everyone involved in making the film.
Scriptwriting Stage
This is where ideas become words on paper. Software can help you format properly. Some tools suggest plot structure, help to track characters and even keep versions so you can go back to earlier drafts.
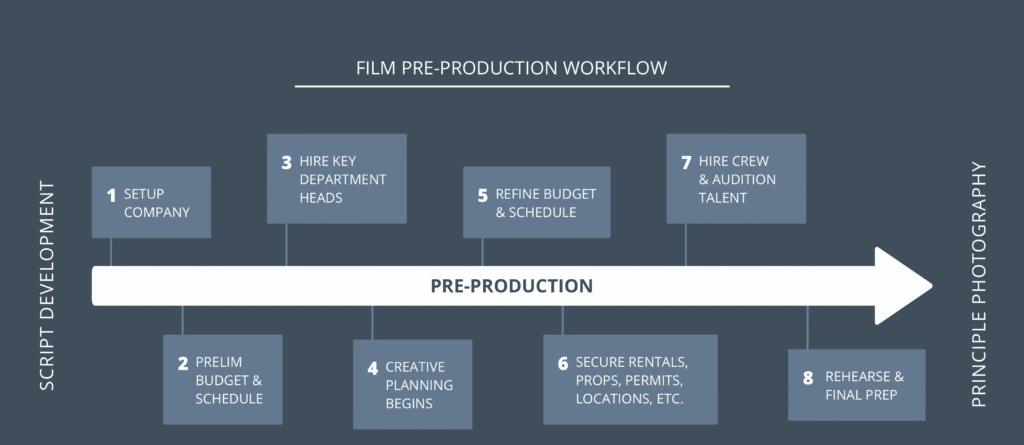
Pre‑Production
Once the screenplay is good, you need to plan the budget, schedule, locations, casting, props and costumes. Software helps you make calendars, budgets, call sheets, storyboards and shot lists. It makes communication easier so everyone knows what is expected.
Production
Filming is chaotic. Schedules shift, people are late and things break. Software keeps track of what scene is being shot, what camera lenses are used, what audio settings, continuity, whether each take is usable. It helps with logging footage, syncing sound and managing daily reports.
Post‑Production
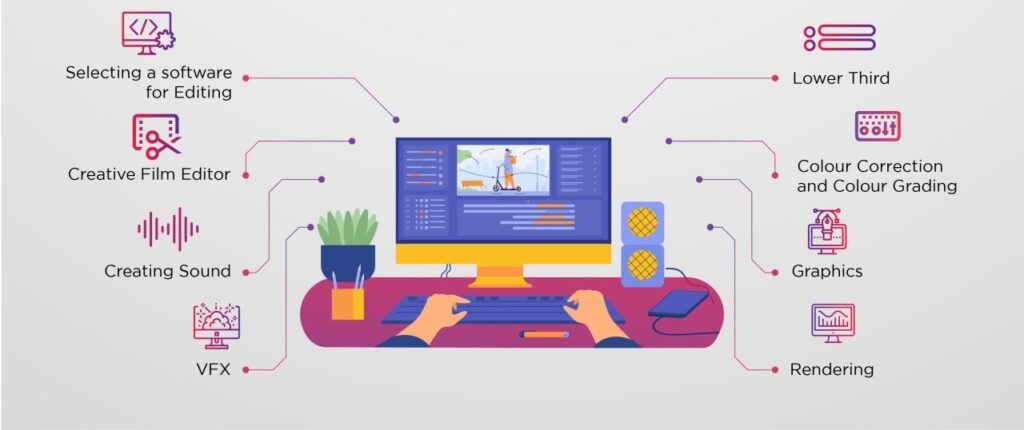
After filming, there is editing, sound design, visual effects and color correction. Software helps organize all the raw footage, work in editing bays, manage versions of cuts, mix audio, add music, correct colors and render the final video. Also helps with backups and archiving.
Delivery, Distribution and Archive
When the film is finished, you need to prepare different formats like theater, web and DVD, compress files, deliver to festivals or streaming platforms. Software can export in the right formats, track submissions, store rights and contracts, manage inventory of assets so nothing is lost. Across all stages, the main benefits of production software are:
- Collaboration: Multiple people like writers, directors and producers can work together, share changes, give feedback.
- Quality control: Provides tools to check consistency, enable better creative decisions.
- Cost control: Helps avoid overspending by checking budgets, tracking costs and staying on schedule.
- Time savings: Automates repetitive work like formatting, version control and shot lists so people can focus on creativity.
- Organization and structure: Keeps scripts, schedules, budgets and files in one place.
- Time savings: Automates repetitive work like formatting, version control and shot lists so people can focus on creativity.
Steps to Plan a Short Film Using Production Software
Making even a short film well requires careful planning. Using software helps make the plan clearer, less chaotic and more achievable. Here’s how to plan a short film step by step, using film production software at each stage.
Step 1: Idea and Script
Brainstorm your story. Write down ideas, themes, character, setting. Use a scriptwriting software (like Celtx or Final Draft) to draft the script. Format the script properly: scene headings, action lines, dialogue. Create versions, get feedback, revise. Keep earlier drafts so you can compare.
Step 2: Storyboarding and Shot List
After the script is stable, break it down into visual pieces using software that lets you storyboard. Decide what shots you need like wide shots, close ups and inserts. Make a shot list. Then, label each shot with location, time of day, lens, etc. If possible, sketch storyboard images or use photo‑based mockups.
Step 3: Budgeting and Resource Planning
Use budgeting software like Movie Magic or StudioBinder to list all cost items. The items include cameras, lights, costumes, props, location fees, permits, food and crew pay. Allocate amounts to each, include contingencies. Also plan for equipment rentals, transportation and insurance.
Step 4: Scheduling and Shooting Plan
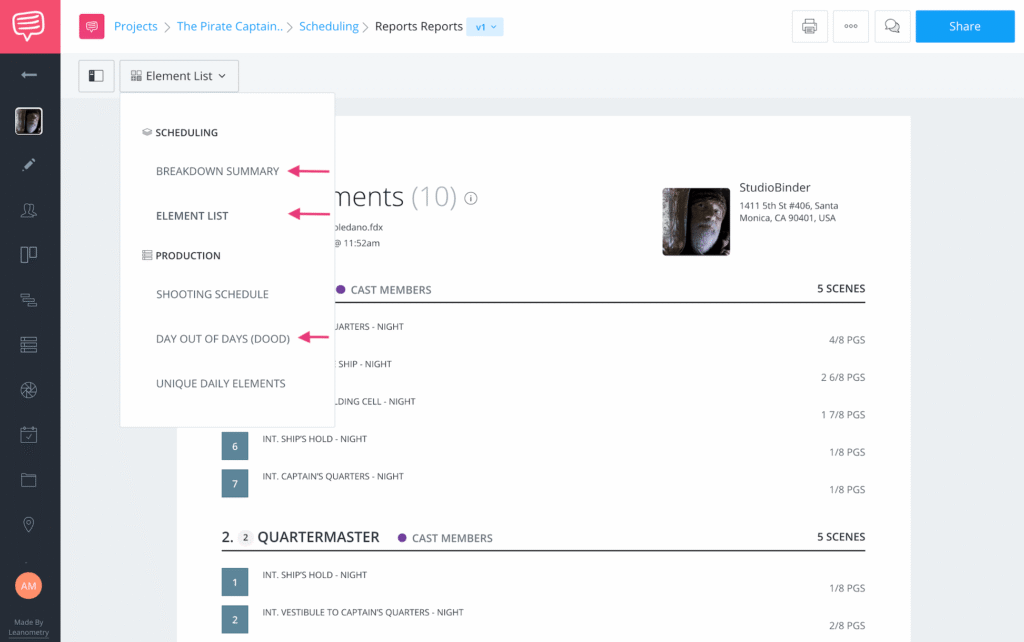
Make a shooting schedule in which scenes will shoot on which day. Consider locations, actors availability, daylight and weather. Create call sheets for each day. What time people arrive, where, who’s needed and what equipment. Software like StudioBinder helps automate these. Assign responsibilities like who is in charge of sound, lighting and makeup.
Step 5: Production – Filming
During filming, use software to log takes: mark which takes are good, note any problems like sound issues and continuity. Keep track of daily production reports like what was shot, what wasn’t, delays and costs incurred. So, use mobile tools or apps to adjust schedule if things change like weather, delays or missing actors.
Step 6: Post‑Production Setup
After filming, collect all raw footage, audio, assets. Use media management tools to organize. Label files and then back them up. Start editing draft cuts and use software that supports version control so previous cuts are preserved. Then, use site like Frame.io for feedback. Show rough cuts to team and get notes pinned to frames.
Step 7: Sound, Visual Effects, Color
Use specialized tools for sound mixing, Foley and voice overs. For visual effects use compositing, graphics, animation. If you had Blender or Fusion, use those. Then color grading and adjust mood, tone, make images look balanced, stylistic.
Step 8: Final Deliverables and Distribution
Choose resolution, codecs depending on how you will distribute. Then, create backups of final files and archive project files. Use software to manage submissions to festivals and track rights or permissions.
How Film Software Makes Movie Making Easier
In the past, filmmakers relied heavily on paper like handwritten scripts, paper schedules, physical boards and physical edits. Mistakes were more frequent and revisions slower. If you are making a short film, investing in tools early, choosing ones that match your needs and using them thoughtfully will save time and money, reduce stress and likely result in a better film. Pick software that makes sense for your scale, collaborate well and let these tools help your creative voice be heard clearly from the first page of script to final export.